by John Henshall
I clone human beings.
Everything was fine until Michael Crichton wrote about cloning dinosaurs in 'Jurassic Park'. That was fiction. Then they cloned Dolly the sheep. That was for real.
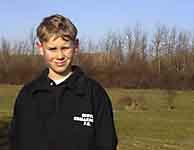
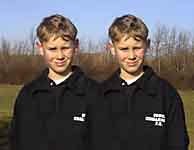
I cloned my son Johnny - sort of like having retrospective twins. He's ten, a great lad and a keen footballer. So maybe we'll have two Man-U players in the family? Anyway we already have two daughters, so it evens things up.
My method of cloning is easier than using a hypodermic to extract DNA from the thorax of a prehistoric fly trapped in amber. All it needs is a clumsy looking digital rubber stamp - one of the Adobe Photoshop™ tools.
DIGITAL REVIVES SILVER HALIDE
We all have a shoebox or two of old family photographs and many of them are faded and torn. They may be tiny contact prints. As nostalgia grips us, wouldn't it be nice to bring those images back to life, maybe print and frame some nice enlargements of our ancestors?
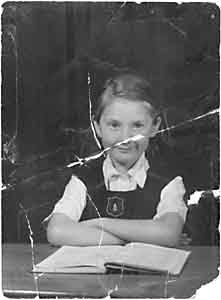
I took a typical old photograph sent in by a reader, a monochrome picture of a schoolgirl seated at a desk. It has been torn, cracked and scratched, the corners battered. Tears have been repaired, using clear adhesive tape, but the glue from this has left a sticky mess on the emulsion. Why is it so damaged? We can only guess. Was it carried around for years in the wallet of her seafaring father?
MAKING IT DIGITAL
First we must get the print into digital form in our computer.
This is best done using a flatbed scanner, which is a very good value digitiser, costing from £100 upwards. My tip is to choose one which includes a 'bundled' copy of Adobe Photoshop. Don't mess around with anything less. Photoshop is the industry standard and, although a complex application, it is easy to learn and apply its powerful functions one at a time. This way, we build our skills into a something potentially very profitable.
 I
scanned the print at 400 pixels per inch - 400 sampling points for
every inch across and along the print. There is no point scanning at
a higher resolution than this because photographic paper does not
carry more detail. The bigger file would be a waste of disc space and
make work slower, unless we have a very powerful computer with plenty
of RAM. I scanned the discoloured black and white print in monochrome
(grey scale) to eliminate fading and discolouration. This also
results in a file size only one third of that of a colour image of
the same physical size.
I
scanned the print at 400 pixels per inch - 400 sampling points for
every inch across and along the print. There is no point scanning at
a higher resolution than this because photographic paper does not
carry more detail. The bigger file would be a waste of disc space and
make work slower, unless we have a very powerful computer with plenty
of RAM. I scanned the discoloured black and white print in monochrome
(grey scale) to eliminate fading and discolouration. This also
results in a file size only one third of that of a colour image of
the same physical size.
ABOUT FILE SIZES
The 4.75 x 6.5 inch print produced a 400 ppi file of 4,940,000 bytes - about 4.7 MB. It's useful to understand these resolutions and how the file sizes come about. The print width of 4.75 inches multiplied by 400 pixels per inch gives a total of 1,900 pixels across the width. The height of 6.5 inches multiplied by 400 pixels per inch gives 2,600 pixels along the length. Multiply these two figures together and we have 1,900 times 2,600 - 4,940,000 pixels in total. That's just short of five million tiny squares, arranged like a mosaic, to describe the image.
SAVE IT
Now that we have our scanned image, my next tip is… save it.
Every time we do work that we wouldn't be able to repeat quickly, 'save it' should be the rule. Even better, do a 'save as…' changing the filename slightly, either with a progressing version number or describing what process we've just applied. We will end up with lots of files with the work saved at each stage of our work. This enables us to go back to any previous point in the restoration and start again from there, without having to go right back to the beginning.
When saving, use the Photoshop file format and benefit from the slightly smaller file sizes due to the lossless compression which this format uses. Never use JPEG. The quality losses, which JPEG relies on to get really big compression, are cumulative. If we repeatedly save, open, work on, and then re-save our files using JPEG, the quality will suffer greatly. Only use JPEG once or twice, right at the end of the work, to make it easier to fit the image on a floppy or send via eMail.
Photoshop is full of shortcuts. Try to use them right from the start - they'll save lots of time. To find out the toolbox shortcuts without referring to the manual, just position the cursor over the desired tool. After half a second or so, a box will pop up saying what the tool is called and what its shortcut key is. You'll soon remember what they are and just hit the keyboard letter.
 •
Use the Zoom tool to magnify the scanned image on screen. To select
the Zoom tool, just press 'z' on the keyboard. To zoom in, click on
the area of the image to be magnified. Keep clicking until the
magnification is sufficient.
•
Use the Zoom tool to magnify the scanned image on screen. To select
the Zoom tool, just press 'z' on the keyboard. To zoom in, click on
the area of the image to be magnified. Keep clicking until the
magnification is sufficient.
• To zoom out, press and hold down the Option key and the Zoom tool changes from + to - . Click now and - you've guessed it - it zoom out.
• Another way to zoom in is by holding down the Command key (Mac) or Control key (PC) and pressing "+"
• Another way to zoom out is by holding down the Command key (Mac) or Control key (PC) and pressing " - "
• To navigate around the image, press and hold the spacebar. The cursor changes to the Hand tool, then we can slide the image around in the window just by clicking and holding the button as we move the mouse.
• To display the whole image as large as possible on screen, double click the Hand tool.
• It's best to work on the image at 100% - often referred to as one-to-one - because at that size each pixel in the image is displayed in one element of the monitor screen.
• To view the image at 100%, double click the Zoom tool.
• At less than 100%, things are more difficult to see because the monitor doesn't display all the pixels. For example, at 25% only one in four of the image's pixels are displayed.
• Above 100% the individual pixels become noticeable. But it's sometimes useful to retouch at 200 or 300% because movements of the mouse are more subtle.
• To enlarge a section of the image to fill the screen, draw
a box with the Zoom tool. Click in the top left corner, then drag to
the bottom right with the mouse button held down. When we release the
button, the selected section is magnified to fill the screen.
SO WHAT DO WE SEE?
 Up
close we can see specks all over the image. These are dust marks
caused by years of grime accumulating on the print. Photoshop has a
great filter called Dust & Scratches… for getting rid of
these easily.
Up
close we can see specks all over the image. These are dust marks
caused by years of grime accumulating on the print. Photoshop has a
great filter called Dust & Scratches… for getting rid of
these easily.
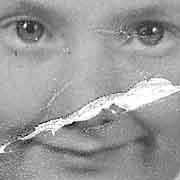
We also see extensive tears and cracks where the picture has gone completely, leaving white paper. Worst of all is the tear right across the girls face. Flesh tones have subtle tonal gradations and are the most difficult to repair. In this particular case, the end of her nose is almost completely missing. The nose is one of the key facial recognition features. It's easy to alter the look of someone by poor retouching, so we have to be careful. Do these difficult parts last, when confidence and skill have been built up.
ELIMINATING DUST AND FINE SCRATCHES
Now this bit is neat - and fast.
Select Filter>Noise>Dust & Scratches… from the Menu Bar at the top of the screen.
Up pops a floating box with a little preview window and a couple of controls. Click on the main image and that part of it appears in the little box. First I tried a Radius setting of 1 pixel. It wasn't enough to get rid of the dust on the picture, so I tried 2 pixels then 3, which was.
Always use the lowest value which cleans up the picture. Too high a value and detail, including features such as eye balls, will be eliminated. Click Preview to see the effect of the selection on the full picture. Click OK when happy.
ELIMINATING THE CRACKS AND TEARS
This part needs more skill but Photoshop makes it much easier than the old method of doing it directly onto a print with an air brush, or dyes and brushes. And if we make a mistake, we don't have to start all over again.
Select the Rubber Stamp tool (just press S) and display the brushes menu by selecting Window>Display Brushes from the Menu Bar. Use the Zoom tool to enlarge a part of the image with a crack or tear.

 The
Rubber Stamp tool allows us to pick up picture information from one
area and then duplicate that information in another area. But it's
better than a real rubber stamp because it constantly replenishes the
stamp with information from the same direction and distance away as
we drag the Rubber Stamp around.
The
Rubber Stamp tool allows us to pick up picture information from one
area and then duplicate that information in another area. But it's
better than a real rubber stamp because it constantly replenishes the
stamp with information from the same direction and distance away as
we drag the Rubber Stamp around.
To begin cloning, I selected a position along a join between the girl's arm and gymslip, just to the left of a tear. Then I held down the Alt key while clicking the mouse button once.
This sets the origin - the place to start duplicating from. The
centre of the pick-

 up
area is at the point of the arrow on the Rubber Stamp tool. The
centre of the arrow turns white as we press Alt.
up
area is at the point of the arrow on the Rubber Stamp tool. The
centre of the arrow turns white as we press Alt.
Here's where the real magic starts. Wherever on the image we click next, the Rubber Stamp will deposit a duplicate of the picture information from the original position we selected. If we click and drag along the tear, the pick-up point follows, maintaining the same offset of direction and distance, filling in the crack.
I stopped before I reached the fold in the arms and re-selected
new pick-up and deposit points along the line of the fold. Then I
dragged upwards, to meet my previous cloning.
 The
result is a repaired arm.
The
result is a repaired arm.
This is the essential secret of cloning: follow the natural lines in the picture, changing our pick-up and deposit points frequently as required. You'll soon get the hang of it as you work around the image. Take particular care with the facial features and check each piece of work carefully, in case you want to Undo - Command-Z (Mac) or Control-Z (PC).
This basic method of cloning actually modifies the pixels in the
scanned image. But Photoshop always has many different ways to help
us.
A BETTER METHOD
Here's a really neat method which doesn't affect the original scan at all. Instead, it deposits the cloned pixels onto another layer, superimposed on top of the original scan - like painting on a transparent film laid over the photo. This means we can selectively erase sections if we want to go back and do them again, so it's a very powerful technique.
Here's how to use it.
 Double
click the Rubber Stamp tool and the Options box pops up. Click the
Sample Merged box. Next click on the Normal box and scroll down to
select Darken. Now select Window>Show Layers from the Menu Bar, to
bring up the Layers box. Click the little turned-page icon at the
bottom, to create a new Layer on top of the original, which then
becomes the Background. Click Layer 1 - the new layer - and it
becomes active, turning its box white-on-black to remind us.
Double
click the Rubber Stamp tool and the Options box pops up. Click the
Sample Merged box. Next click on the Normal box and scroll down to
select Darken. Now select Window>Show Layers from the Menu Bar, to
bring up the Layers box. Click the little turned-page icon at the
bottom, to create a new Layer on top of the original, which then
becomes the Background. Click Layer 1 - the new layer - and it
becomes active, turning its box white-on-black to remind us.
This time, whatever is cloned using the Rubber Stamp is deposited
on the transparent layer, leaving the original untouched. When Darken
is selected, Photoshop only applies  cloned
information to the active layer if it is darker than the pixels in
the layer beneath - which they are, because the scratch and tears are
almost white. This make the cloning very easy.
cloned
information to the active layer if it is darker than the pixels in
the layer beneath - which they are, because the scratch and tears are
almost white. This make the cloning very easy.
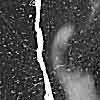
Clicking a layer makes it active, clicking the little eye on the
left makes the layer invisible. If we make the background invisible
we can see the result of our cloning - just the filling-in of the
cracks and tears - see below.
Finally, integrate the layers by clicking the little right pointing arrow near the top right of the Layers box and selecting Flatten Image.
 •
Select File>Preferences>Display & Cursors… then click
the Brush Size radio button. The cursor will now display as the size
and shape of the brush we choose.
•
Select File>Preferences>Display & Cursors… then click
the Brush Size radio button. The cursor will now display as the size
and shape of the brush we choose.
•
Cycle through brush sizes by using the "[" (left square bracket)
key to reduce size, "]" (right square bracket) to increase.
• To show the precise position of a tool (such as the Rubber Stamp tool), press Caps Lock.

Left: The layer shows the results of our cloning. Right: The final retouched photo.
SO THERE WE HAVE IT…
Some folk believe that digital imaging will kill off the old silver halide photography. On the contrary - Adobe Photoshop, and its Rubber Stamp tool in particular, has just helped give an old torn, cracked and broken photo a new lease of life. And nothing was added. Every part of the restored image was already present in the damaged original - though not in quite the same places.